Express Shipping
Orders before 2pm, ship today
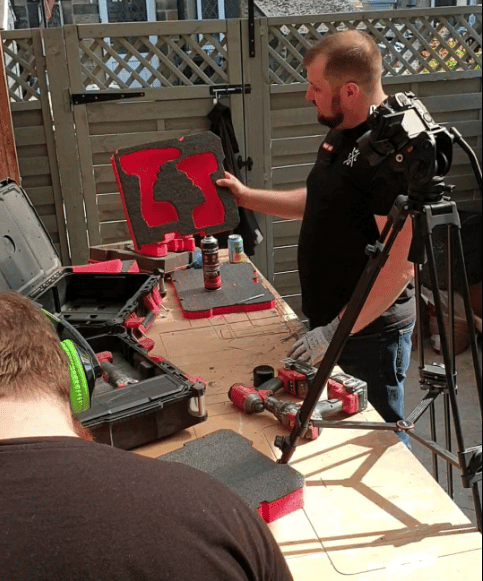
You may have seen our visit earlier this month to tool fan Milwaukee Dave. While there we spotted that a Packout box or two were organised using either old Polyurethane foam or the original soft Milwaukee foam from a different, smaller box. So we couldn’t resist doing a bit of an upgrade on them. Just by way of thanks to Dave for having us over to visit. As luck would have it, we’d travelled with some “spare” Milwaukee Packout inserts. We had both 30mm and 50mm, and of course our trusty cutting kit. So together with his Milwaukee tool boxes, we had all we needed to do a neat transformation for him. milwaukee multi tool

In the first packout box, we had a couple of drills with drill clips attached. We wanted to keep these in the same format as they were already in. Just in some improved foam.
The second box contained a Milwaukee multi tool and a jigsaw. The same went for those too. Dave’s Milwaukee tool layout has worked for him for many years so we wanted to keep it the same.
Just like us, Dave is a big believer that organising and protecting tools extends their lifespan and stops you losing items or misplacing them. This means that you will potentially have your tools for a lot of years in the same box. And hopefully, in the same tool control foam. Therefore it’s really important to be able to keep the foam intact and clean when in use. The older softer foams, as with pick and pluck, can begin to work lose and even fall apart over time. Equally because the material is softer it’s likely to absorb any spills, dirt or grease it comes into contact with.
With Shadow Foam, the material is a lot more robust so it will last much longer than softer foams. But importantly too, it’s wipeable and cleanable. So you won’t have lingering stains or residue on there for years and years. Essentially, by replacing these old inserts we’re giving Dave the same levels of tool control and organisation he’s always enjoyed but in a more durable, longer lasting way. milwaukee multi tool packout box
We’ve created a lot of tools and guides to help you when ShadowFoaming. So for this, the basic ways of working are just the same as always. We always recommend that you use our Shadow Foam cutting equipment whenever working with the foam for best results. And we’ve plenty of guides and inspiration on how to do it on our YouTube channel. As a minimum we’d recommend you watch our How to Cut and How to Peel videos to familiarise yourself with the best techniques.
This was going to be ever so slightly different to normal though. That’s because we also wanted for Dave to retain the Milwaukee Trays that come with the boxes. So this meant customising the size and shape of the inserts to suit the remaining, smaller, footprint of the case. This was a quick and easy job to do since we used the original insert as a template. Then using our scalpel, we cut through the replacement inserts so they’d be the same size.
The second difference to normal was that we were going to make extra deep inserts by layering up a 50mm and a 30mm insert together to give us an 80mm foam depth. This meant we knew the foam would easily accommodate bigger items like the drills and Milwaukee multi tool etc. For this we enlisted the help of our spray glue. Importantly in this process we kept the cut-out tool shapes that we made. That meant we could pop them back into the holes before we sprayed the glue. This created the same effect as masking off the holes but much more quickly. Once we’d sprayed both “joining” faces of the foam, we left them a few seconds to go tacky then placed them together. Doing it this way bonds them together nice and tightly. And voila, there you have an extra deep insert whenever you need it.

We think Dave was pleased with the finished result. The new replacement foam will certainly help protect those tools when out and about for many more years to come. Also refreshing the old polyurethane foam has certainly brightened up the cases.
It’s been great fun working with Milwaukee Dave for a few hours. But also for us, it’s been nice to have the opportunity to work with some Milwaukee gear too.
Please do share with us your own transformations and lets see if we can find anyone with a tool collection as expansive as his!
{"one"=>"Select 2 or 3 items to compare", "other"=>"{{ count }} of 3 items selected"}