Express Shipping
Orders before 2pm, ship today
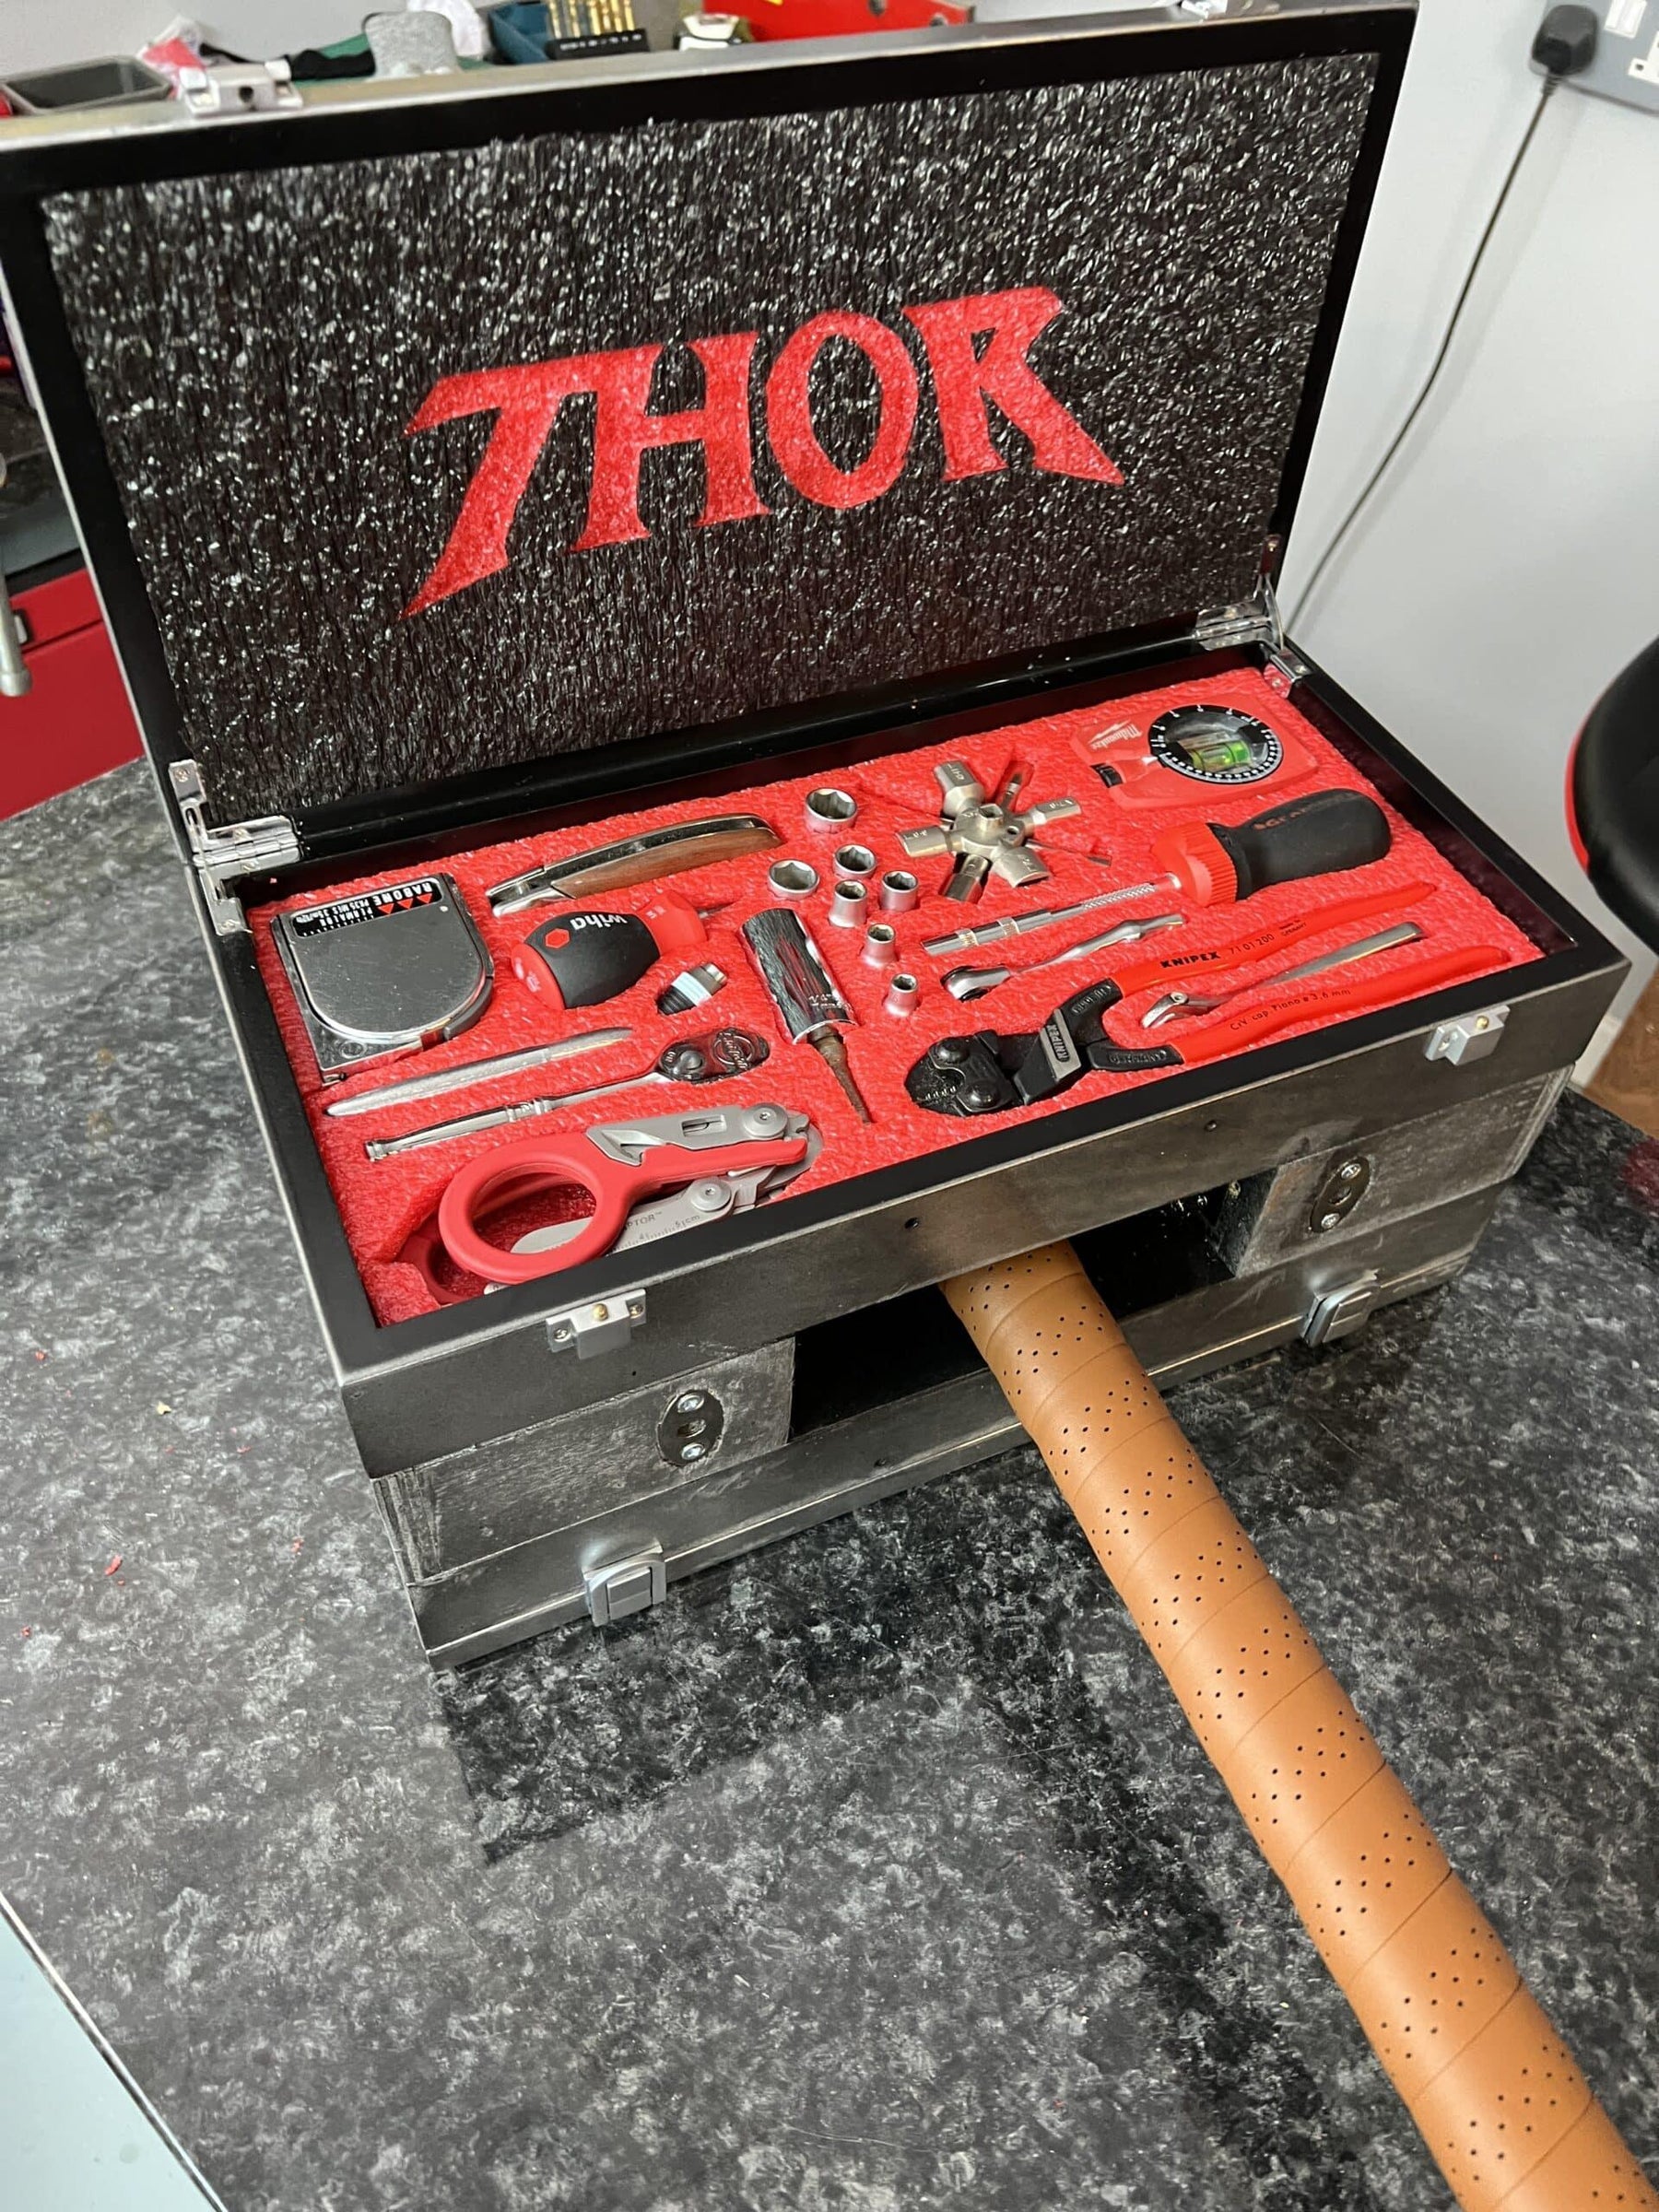
With the impending release of Marvel‘s latest release, Thor: Love and Thunder, and having been left a little underwhelmed with a Thors hammer toolbox that Jonathan got off Amazon recently, there was only one thing for it. Another quirky Shadow Foam project to make a bigger and better Thors hammer toolbox ourselves!
In Norse mythology Thor’s name means “Thunder” and he was thought to be the god of the storm. So thunder was perceived as being the sound of his hammer crashing down on his foes. Interesting then that the old Norse name for his hammer, is Mjöllnir, wich is thought to mean “lightening”
In the Marvel Cinematic Universe though, the name becomes “Mjolnir“. It’s typically depicted as a large, square-headed gray sledgehammer, with a short, round handle wrapped in brown leather. As you’d expect, it’s an enchanted and magical weapon with many powers and abilities.
However never in his wildest dreams would Thor have dreamt his hammer could contain every tool he’s ever likely to need! So there were the beginnings of our plan.
…was very disappointing to say the least! More bore than Thor. You can pick these up on Amazon for anywhere between about £40-£100.00 and there may be some subtle differences between the ones out there. But the one we got, whilst the box itself was quite cool, actually contained some pretty poor tools.

We really loved the idea of this case. It’s a plastic blow-moulded case which unclips on the sides and folds out. Then the hammer handle itself is made out of… a hammer! Genious right!? Well at least it would have been if the rest of the case had lived up to that great start. But there was only a small selection of tools in it, the selection of which was a bit lack-lustre in our opinion. Though there was a quirky little Thors hammer shaped bottle opener which we really liked. But still, it served as great inspiration for us to build on.
We visited quite a few antiques stores to find just what we wanted to create the basis of our box. In the end we happened on a couple of matching vintage jewellery cases which we bought for £7.50 each. All we needed to do was remove the velvet trays and when placed together these gave us the start of a very nicely hammer-shaped container.
So what was going to go in there…? Well remember this compact tool case project we did a while back? Well that’s going to be the basis around which we’ll work. It had everything in there we needed for this case (with the exception of a hammer) so with just one or two potential changes, that’s what we’ll be using.
Next, and very importantly of course, we needed a hammer. Now a claw-hammer wasn’t going to work for this as we were scaling-up the project from the original. So we ended up with a sledgehammer. The smallest one we could get from B&Q was 3kg. Whilst the handle was slightly longer than we’d ultimately want, the rest of the proportions were just about perfect.

We had a couple of pieces of 18mm MDF laying around, along with a 22mm piece of chipboard. And that’s what we were going to use as the basis to make the centre “hammer holding” part of the box. Essentially the middle section that would sit between the two sides of the toolbox.
We stripped back the two boxes we got from the antique centre, and removed their ornate handles. Then, we measured and cut the two MDF and one chip board piece. Also cutting in a hole in the middle at the top just large enough for the hammer head. We made these 12mm too small all the way around to make sure we could box them in neatly for a nice flat finish. For this we were going to make a 12mm plywood band for a nice smooth edge.
We took the three layers and then glued and pin-nailed them together. Then gave them a light sanding off to get a smooth edge for the plywood band to attach to.
Turned out the mechanism we’d planned for locking the hammer into place (B&Q flush bolts) just wasn’t going to be fit for purpose now. We were going to need something a little more heavy-duty. So a trip to our local Aladdin’s cave, Whiteshaws DIY in Northwich was in order. This is the kind of place you can literally find anything. And right enough, we came away with just what we needed (plus a lot more!)

Following our shopping trip, with a couple of cans of silver spray paint, and some matt black spray for some dry brushing that was the paint job in hand. The bigger job of locking the hammer head into place was also on the way to being solved too. We opted for some security door bolts which lock and unlock with a generic star key. When twisted the key turns and locks the dead-bolt into place.
Our original plan to drill the centre out of the hardened steel face of the hammer didn’t quite pan out though. So in the end we ended up dropping the sitting position of the hammer in the play box so the locks could be fitted above it. It was a compromise, but still worked really well.
With everything now working as it should, it’s time to add some details!
First up, a couple of layers of the silver spray paint on the box. Once dry we added a dust coating of the matt black. This gave it a really great rustic patina and tha authentic, aged effect we were after. With that all done and dry we can then add back the hardware (catches etc).
Next, getting that sledgehammer handle cut to size. From a scale perspective we decided 66cms would work perfectly for us so it was sawn off at that point. To decorate, we used some good old-fashioned leather look bicycle handle wrap. This helped us nicely replicate the effect on Thor’s hammer, it also made it really grippy too which was great. Especially given how heavy it ended up being!
As always we went for our customary red and black combo. In a slight change to normal though, we are flipping one sheet. So the top where we’ll put a logo will be red out of black. But then the base where the tools go will be red side up for real impact. We had our sheets cut to size to fit the box. You can do this too using our Custom Size foam service. Or, just cut something down to size from our value packs or medium sheets, whatever suits you best. 30mm foam fitted nicely in the base for the tools.
You might notice that the lids are quite shallow though and we needed 10mm depth foam. The shallowest depth we sell is 30mm. But this was quite easy to achieve by just taking a 30mm sheet and cutting / peeling by hand to remove 20mm of the depth from the reverse.
We took our original compact tool case and earmarked all the tools from it that we really wanted to include in this build. That included our Leatherman raptor scissors, micro screwdriver set and blades. And basically as much of the original content that we could fit. But we did have to lose a few pieces along the way.
As always, we planned the layout before cutting and peeling the foam to house every tool. For more information on how this is done, watch any one of our YouTube videos.

As you’ll see in the video of the make, all we needed to do to achieve a really professional logo in each of the lids was print out the logos in the size we wanted. Next we trace cut through the lines on the print into the foam. Once the foam was removed, there were our logos! It can get fiddly if you have smaller space or lettering. But overall it’s really worth the time and effort to brilliantly personalise or customise anything you’ve made.
Well we’re pleased with it, but we would love to know what you think too. It’s a definite upgrade on the Amazon Thors Hammer we received. Weighing in at a hefty 9.26kg when empty or 12.6kg with all the tools in it, it’s a War Hammer any Marvel hero would be proud to wield!

{"one"=>"Select 2 or 3 items to compare", "other"=>"{{ count }} of 3 items selected"}