Free UK Next Day Delivery*
Daily order cutoff at 2pm

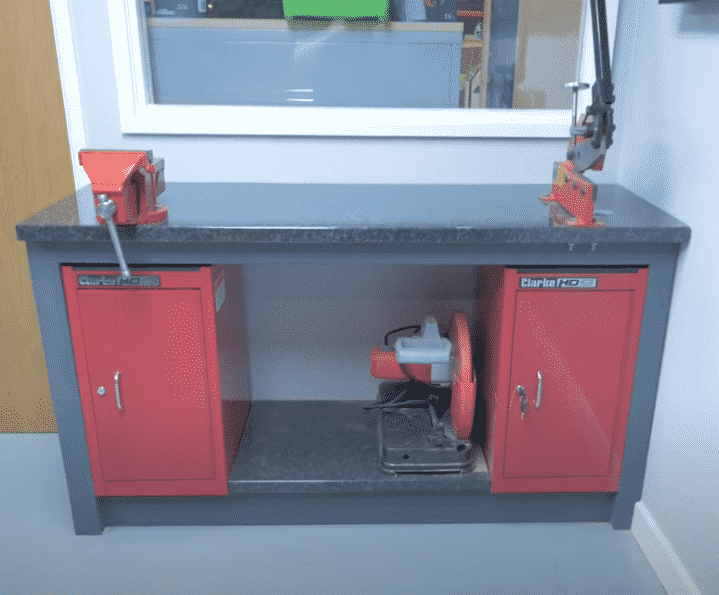
We needed to make a workbench in order to clear out our cluttered studio space and put it to better use. We’ve got some exciting projects coming up and really need the additional space that making a workbench would create. But, we also wanted to do it on a budget. So we repurposed two Clarke HD tool cabinets and some left over worksurface to create a space-saving and multi-purpose work area and a place for our small Axminster bandsaw, metal chop saw and mitre saw to live.
Take a look and see the full build here!

We already had some 40mm countertop left over from when we housed our roll-cabs. Not enough for everything but certainly enough for a shelf. But we’d need to buy some more for the top. We also had our Clarke HD tool cabinets which were originally intended to be side cabinets for our roll cab. But it didn’t quite work out that way as they were a lot shorter. So this is a really good way of re-purposing them.
We calculated we’d need around 20 meters of 3×2 CLS timber along with the additional workshop to headed off to our local B&Q to get what we needed.
As we always say, planning is the most important part of the process. So Jonathan, as always, drafted his own plans for the build to give us the optimum space-saving storage we wanted for purpose.
We knew the optimum height we wanted for the main work service, and obviously the height of the re-purposed Clarke Tools cupboards, then the rest was planned around that.
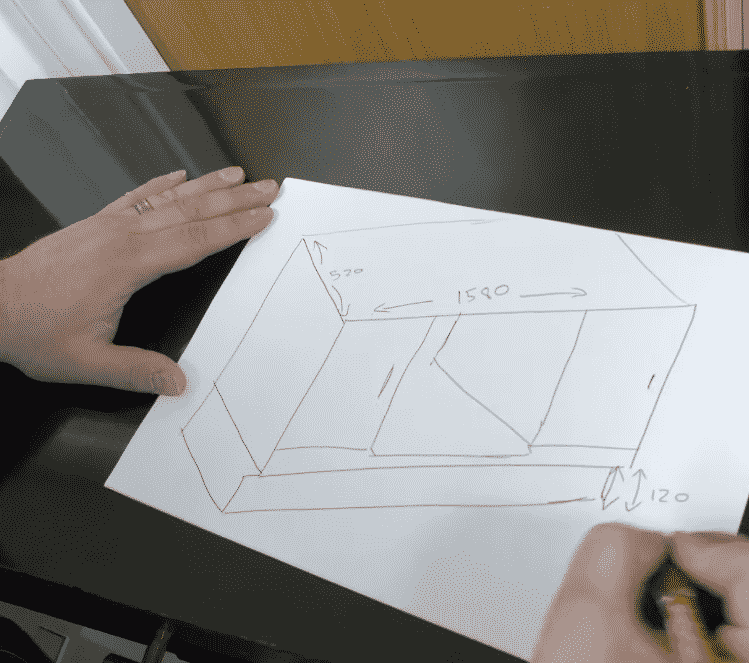
However, as it turns out, what we didn’t quite factor correctly into these plans was:
* Base width
We made the base a touch too wide to fit the space.
* Shelf height
The band saw which was the original inspiration for the work bench didn’t fit under the counter. By some distance! Ooops.
But as they say “we don’t make mistakes, we make happy accidents!” Every day is a schoolday…

The width of the cabinet was easy to overcome as we just removed a small section of skirting board and achieved the perfect fit.
However, given the hiccup we hit with the build and shelf height we did need to adapt it’s usage slightly. We added at one end of the worktop a heavy duty vice, and at the other end a Sealey metal cutting shear. The latter is something that’s going to be really useful for us as it can cut up to 6mm steel and will be invaluable in a project we have coming up soon.
So, the Axminster band saw is still looking for a home. But it’s good to be flexible sometimes with these things, right!?
So, for less than £150, and in around 4 hours, we managed to achieve a finished workbench. It didn’t quite meet our original brief, but never-the-less we’re pretty happy with it. It would be great to know what you think of it and if there’s anything you would have done differently.
We were also buzzing that this “bootstrapping” project as we called it got picked up by our local press, with the Northwich Guardian running this piece on it.
We would also love to see if you’ve had a go at making a workbench. We are all about inspiring ideas and sharing what others create to help inspire others. So please check out our socials for more ideas, or to share your epic makes. Our facebook community is a great place for getting support and advice with makes too, so do call in!
{"one"=>"Select 2 or 3 items to compare", "other"=>"{{ count }} of 3 items selected"}